WebRTCのHTMLコードの簡略化
前回の WebRTCのHPのソースコードを以下の様に簡略化しました。
- ”remote”, “local”の2画面を”remote”のみにする。
- ”Pause” , “Mute”, “Fullscreen”, “Recording” ボタンを廃止。
- 画面サイズはwidth=”640″ height=”480″に固定。
- Advanced optionsで、”Trickle ICE”をtrueに固定。
簡略化したソースのファイル。(”webrtc.html")
<!DOCTYPE html>
<html>
    <head>
        <meta charset="UTF-8">
        <title>UV4L WebRTC</title>
        <script type="text/javascript">

            var ws = null;
            var pc;
            var audio_video_stream;
            var mediaConstraints = {
                optional: [],
                mandatory: {
                    OfferToReceiveAudio: true,
                    OfferToReceiveVideo: true
                }
            };
            var iceCandidates = [];

            function createPeerConnection() {
                try {
                    pc = new RTCPeerConnection();
                    pc.onicecandidate = onIceCandidate;
                    pc.ontrack = onTrack;
                    pc.onremovestream = onRemoteStreamRemoved;
                    console.log("peer connection successfully created!");
                } catch (e) {
                    console.error("createPeerConnection() failed");
                }
            }

            function onIceCandidate(event) {
                if (event.candidate && event.candidate.candidate) {
                    var candidate = {
                        sdpMLineIndex: event.candidate.sdpMLineIndex,
                        sdpMid: event.candidate.sdpMid,
                        candidate: event.candidate.candidate
                    };
                    var request = {
                        what: "addIceCandidate",
                        data: JSON.stringify(candidate)
                    };
                    ws.send(JSON.stringify(request));
                } else {
                    console.log("End of candidates.");
                }
            }

            function addIceCandidates() {
                iceCandidates.forEach(function (candidate) {
                    pc.addIceCandidate(candidate,
                        function () {
                            console.log("IceCandidate added: " + JSON.stringify(candidate));
                        },
                        function (error) {
                            console.error("addIceCandidate error: " + error);
                        }
                    );
                });
                iceCandidates = [];
            }

            function onTrack(event) {
                console.log("Remote track!");
                var remoteVideoElement = document.getElementById('remote-video');
                remoteVideoElement.srcObject = event.streams[0];
            }

            function onRemoteStreamRemoved(event) {
                var remoteVideoElement = document.getElementById('remote-video');
                remoteVideoElement.srcObject = null;
                remoteVideoElement.src = ''; // TODO: remove
            }

            function start() {
                if ("WebSocket" in window) {
                    document.getElementById("stop").disabled = false;
                    document.getElementById("start").disabled = true;
                    document.documentElement.style.cursor = 'wait';

                    var protocol = location.protocol === "https:" ? "wss:" : "ws:";
                    ws = new WebSocket(protocol + '//raspberrypi.local:8090/stream/webrtc');

                    ws.onopen = function () {
                        iceCandidates = [];
                        remoteDesc = false;
                        createPeerConnection();
                        var request = {
                            what: "call",
                            options: {
                                force_hw_vcodec: false,
                                vformat: "30",
                                trickle_ice: true
                            }
                        };
                        ws.send(JSON.stringify(request));
                        console.log("call(), request=" + JSON.stringify(request));
                    };

                    ws.onmessage = function (evt) {
                        var msg = JSON.parse(evt.data);
                        if (msg.what !== 'undefined') {
                            var what = msg.what;
                            var data = msg.data;
                        }
                        console.log("message =" + what);

                        switch (what) {
                            case "offer":
                                pc.setRemoteDescription(new RTCSessionDescription(JSON.parse(data)),
                                        function onRemoteSdpSuccess() {
                                            remoteDesc = true;
                                            addIceCandidates();
                                            console.log('onRemoteSdpSucces()');
                                            pc.createAnswer(function (sessionDescription) {
                                                pc.setLocalDescription(sessionDescription);
                                                var request = {
                                                    what: "answer",
                                                    data: JSON.stringify(sessionDescription)
                                                };
                                                ws.send(JSON.stringify(request));
                                                console.log(request);

                                            }, function (error) {
                                                alert("Failed to createAnswer: " + error);

                                            }, mediaConstraints);
                                        },
                                        function onRemoteSdpError(event) {
                                            alert('Failed to set remote description (unsupported codec on this browser?): ' + event);
                                            stop();
                                        }
                                );
                                break;

                            case "iceCandidate": // when trickle is enabled
                                if (!msg.data) {
                                    console.log("Ice Gathering Complete");
                                    break;
                                }
                                var elt = JSON.parse(msg.data);
                                let candidate = new RTCIceCandidate({sdpMLineIndex: elt.sdpMLineIndex, candidate: elt.candidate});
                                iceCandidates.push(candidate);
                                if (remoteDesc)
                                    addIceCandidates();
                                document.documentElement.style.cursor = 'default';
                                break;
                        }
                    };

                    ws.onclose = function (evt) {
                        if (pc) {
                            pc.close();
                            pc = null;
                        }
                        document.getElementById("stop").disabled = true;
                        document.getElementById("start").disabled = false;
                        document.documentElement.style.cursor = 'default';
                    };

                    ws.onerror = function (evt) {
                        alert("An error has occurred!");
                        ws.close();
                    };

                } else {
                    alert("Sorry, this browser does not support WebSockets.");
                }
            }

            function stop() {
                if (audio_video_stream) {
                    try {
                        if (audio_video_stream.getVideoTracks().length)
                            audio_video_stream.getVideoTracks()[0].stop();
                        if (audio_video_stream.getAudioTracks().length)
                            audio_video_stream.getAudioTracks()[0].stop();
                        audio_video_stream.stop(); // deprecated
                    } catch (e) {
                        for (var i = 0; i < audio_video_stream.getTracks().length; i++)
                            audio_video_stream.getTracks()[i].stop();
                    }
                    audio_video_stream = null;
                }
                document.getElementById('remote-video').srcObject = null;
                document.getElementById('remote-video').src = ''; // TODO; remove
                if (pc) {
                    pc.close();
                    pc = null;
                }
                if (ws) {
                    ws.close();
                    ws = null;
                }
                document.getElementById("stop").disabled = true;
                document.getElementById("start").disabled = false;
                document.documentElement.style.cursor = 'default';
            }

        </script>
        <style>
            video {
                background: #eee none repeat scroll 0 0;
                border: 1px solid #aaa;
            }
        </style>
    </head>
    <body>
        <h1><span>WebRTC two-way Audio/Video Intercom</span></h1>
        <video id="remote-video" autoplay="" width="640" height="480">
            Your browser does not support the video tag.
        </video><br>
        <button id="start" style="background-color: green; color: white" onclick="start();">Call!</button>
        <button disabled id="stop" style="background-color: red; color: white" onclick="stop();">Hang up</button>
    </body>
</html>
ブラウザでこのファイルを読み込むと下記の画面が表示されます。 左下の”CALL”ボタンをクリックするとStreamingが開始。 ”Hang Up”ボタンをクリックでStreaming終了です。

ポート8090のサーバについて
ポート8090にアクセスするとコントロールパネルが表示されます。 今回はUSBカメラを使用しているでこのポートですがカメラがRaspberry PI専用の場合 ポートは8080になるそうです(試していませんが)。
このサーバの主な役割は以下の通り。
- ストリーミングの開始・停止(P2P接続時のシグナルサーバ)。
- 解像度やフレームレート(FPS)の変更
- カメラパラメータの調整
- 等
ファイルがブラウザに読み込まれてStreamingが開始されるまで下記の様な流れになります。
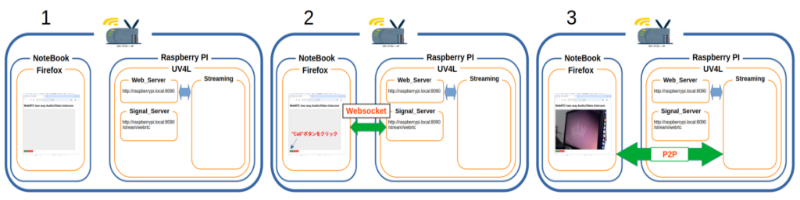
- 初期状態。Raspberry PIとNoteBookは同一のLANの中にいる。
- Raspberry PI側: UV4Lを立ち上げる
- NoteBook側: ブラウザ(Firfox)を上げる
- HP左下の”CALL”ボタンをクリック
- HPのコードがUV4LのSignal_ServerとWebsocketで接続。
- ブラウザとRaspberry PIの間でP2P接続に必要な情報を交換する。
- 情報が整うとP2Pが開通しStreamingが始まる。
P2P接続に関して
P2P接続の為の情報の交換は以下の様に行われています。
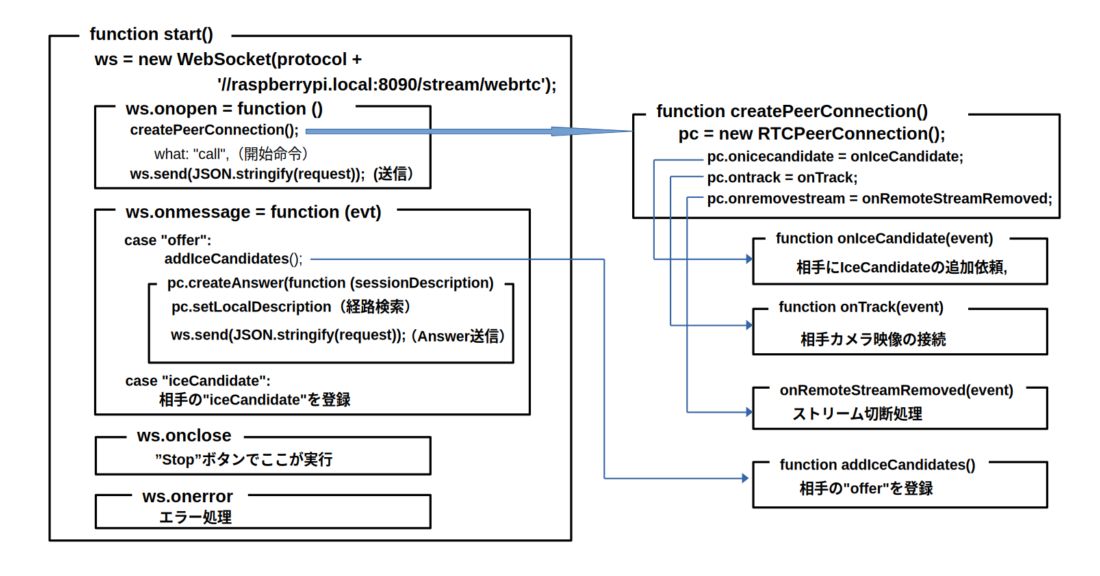
- HPの”CALL”ボタンをクリックすると”function start()”へ飛ぶ。
- ws = new WebSocket(protocol +’//raspberrypi.local:8090/stream/webrtc’);
UV4LのSignal_serverにwebsocketで接続。 - ws.onopen:Signal_serverと接続したらここが実行。
- createPeerConnection();:P2Pの準備を行う関数を実行
- pc = new RTCPeerConnection(); P2P用インスタンスの作成
- pc.onicecandidate = onIceCandidate; イベント関数宣言
- pc.ontrack = onTrack; イベント関数の宣言
- pc.onremovestream = onRemoteStreamRemoved; イベント関数の宣言
- 各イベント関数の説明
- function onIceCandidate(event)
- IceCandidateが見つかったら発動する関数。
- 相手にIceCandidateを送信し登録を依頼
- function onTrack(event)
- P2Pの接続が完了した発動する関数。
- 画像データを接続する。
- onRemoteStreamRemoved(event)
- Streamingが削除された時に発動する関数。
- ws.send(JSON.stringify(request));
- 続いて”call”コマンドを送信して相手にP2Pの準備を依頼。
- ws.onmessage = function (evt) 相手からのメッセージを処理する関数。
- case “offer”: 相手メッセージが”offer”の場合
- addIceCandidates(); 受信したIceCandidateを登録
- pc.createAnswer(function (session ここで送信用IceCandidate(Answer)を作成
- pc.setLocalDescription IceCandidateを検索
- ws.send(JSON.stringify ここで相手に送信
- case “iceCandidate”: 相手メッセージが”iceCandidate”の場合
- ”iceCandidate”の登録
- ws.onclose Signal_serverが切断されると実行。
- ws.onerror Signal_serverとの接続でエラーが発生した時に実行。
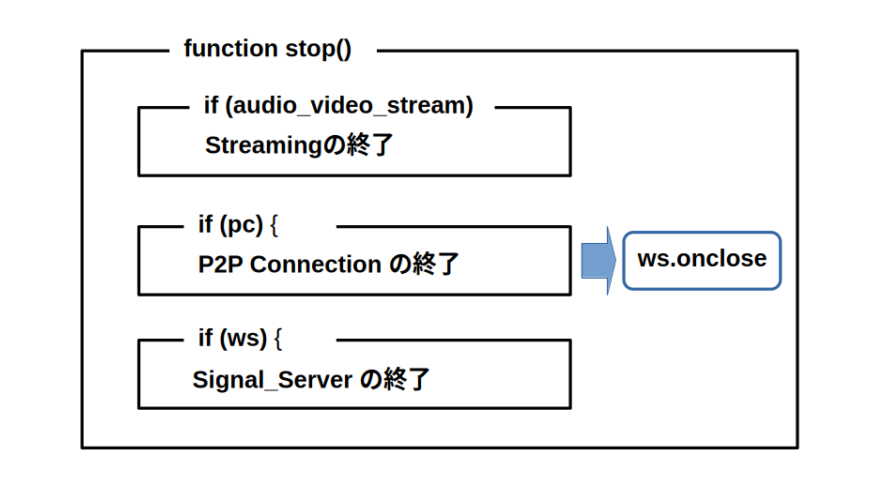
Streamingの終了
Streamingの終了はstopt()関数が担当。Streaming、P2P、Signal_serverの順に終了します。
P2P通信とSignal_Server
P2P通信はサーバを介さずに端末同士で直接データを通信する技術ですが、 P2Pを確立する為にはお互いの情報を交換する必要が有ります。この情報交換をSignal_Serverと通して行います。 今回のコードでは”raspberrypi.local:8090/stream/webrtc”がSignal_Serverの役目を果たしています。 互いに交換するデータは主に下記の2つ。
- Session Description Protocol (SDP)
- 通信するメディアの種類(音声、映像)、メディアの形式(コーデック)
- IPアドレス、ポート番号
- 暗号化の鍵 等
- ICE Candidate
- P2P通信を行う際に使われる通信経路の候補
- どのような通信経路が使えるかは、お互いのネットワーク環境に依存。
- 通信相互で経路の候補を挙げ、通信が繋がった時にその経路を使う。
UV4LのSignal_Serverにはのアクセスフォーマットが有ります。 WebRTC signaling によるとフォーマットは下記。
- what:リクエストの内容
- options: 設定パラメータ。
- force_hw_vcodec: ビデオコーデックの有無
- vformat: 画面の解像度
- trickle_ice: 候補の送信方法
Signal_Serverの役目はP2Pが開通するまでの情報交換のみ。 開通するとP2PでStreamingを行い、Signal_ServerはStreamingに全く関与しません。
UV4Lに関する資料
UV4LとWebRTCの違いは
UV4L:User space Video4Linux。 WebRTC:Web Real-Time Communication。 どちらもP2PでStreamingを行うアプリ。簡単に両者を比較。
| 項目 | UV4L | WebRTC |
|---|---|---|
| ブラウザ | 不要 | 必要 |
| MediaDevice使用許可 | 許可無しでOK/td> | 必要 |
| 追加機能 | Web,Signalサーバ等 | ーーー |
大きな違いは実行時のウザの有無とMediaDeviceの使用許可が必要無い点です。 監視用カメラには必要な条件です。
次回は
P2P、Signal_server、UV4Lの関係が大まかに理解出来ました。 相手側からの映像と音声のStreamingは出来る様になりました。 次回はこちら(PC側)から音声と映像の送信を試して見ます。