概要
今回は文字関係のデモプログラム "Free_Font_Demo" です。 スケッチは IDE でファイルー>スケッチ例ー>TFT_eSPIー>320x240ー>Free_Font_Demoに有ります。
Free_Font_Demo
"Free_Font_Demo.ino" の実行結果とスケッチは以下の通り。
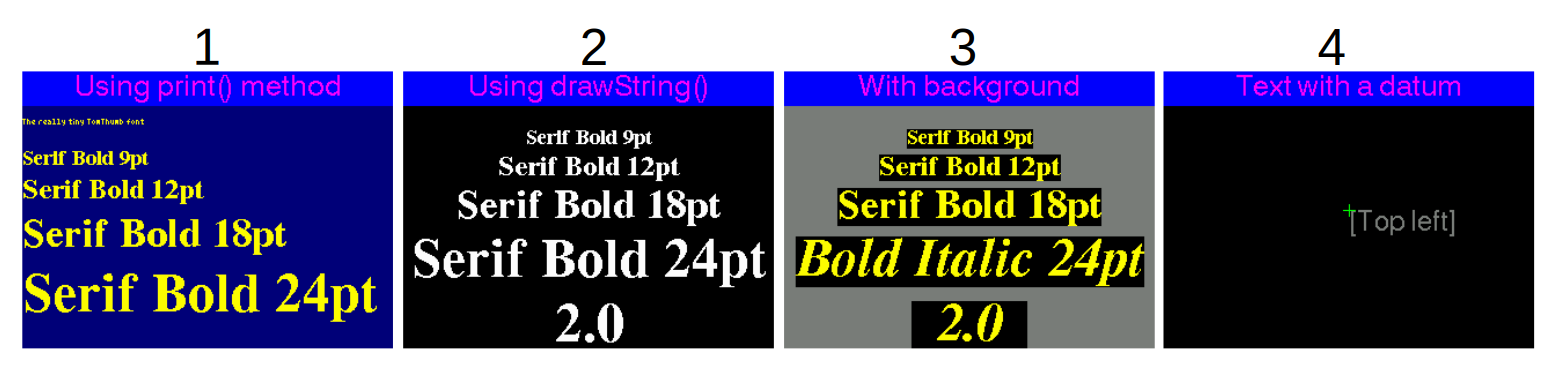
- print classを使った文字表示のデモ。68行目から。
- 関数 "drawString()" を使ったデモ。106行目から。
- 関数 "drawString()" を使い境界をBOXで囲んだデモ。145行目から。
- 文字基準(12個)に従って文字列を表示するデモ。184行目から
- 1.から4.を繰り返す。
Free_Font_Demo.ino
arduino
/*
  This example draws fonts (as used by the Adafruit_GFX library) onto the
  screen. These fonts are called the GFX Free Fonts (GFXFF) in this library.

  Other True Type fonts could be converted using the utility within the
  "fontconvert" folder inside the library. This converted has also been
  copied from the Adafruit_GFX library.

  Since these fonts are a recent addition Adafruit do not have a tutorial
  available yet on how to use the utility.   Linux users will no doubt
  figure it out!  In the meantime there are 48 font files to use in sizes
  from 9 point to 24 point, and in normal, bold, and italic or oblique
  styles.

  This example sketch uses both the print class and drawString() functions
  to plot text to the screen.

  Make sure LOAD_GFXFF is defined in the User_Setup.h file within the
  TFT_eSPI library folder.

  --------------------------- NOTE ----------------------------------------
  The free font encoding format does not lend itself easily to plotting
  the background without flicker. For values that changes on screen it is
  better to use Fonts 1- 8 which are encoded specifically for rapid
  drawing with background.
  -------------------------------------------------------------------------

  >>>>>>>>>>>>>>>>>>>>>>>>>>> WARNING <<<<<<<<<<<<<<<<<<<<<<<<<<<<<<<<<<<<<

  As supplied with the default settings the sketch has 11 fonts loaded,
  i.e. GLCD (Font 1), Font 2, Font 4, Font 6, Font 7, Font 8 and five Free Fonts,
  even though they are not all used in the sketch.

  Disable fonts you do not need in User_Setup.h in the library folder.

  #########################################################################
  ###### DON'T FORGET TO UPDATE THE User_Setup.h FILE IN THE LIBRARY ######
  #########################################################################
*/

#include "SPI.h"
#include "TFT_eSPI.h"

#include "Free_Fonts.h" // Include the header file attached to this sketch

// Use hardware SPI
TFT_eSPI tft = TFT_eSPI();

unsigned long drawTime = 0;

void setup(void) {

  tft.begin();

  tft.setRotation(1);

}

void loop() {

  int xpos =  0;
  int ypos = 40;

  // >>>>>>>>>>>>>>>>>>>>>>>>>>>>>>>>>>>>>>>>>>>>>>>>>>>>>>>>>>>>>>>>>>>>>>>>>>>>>>>>>
  // Select different fonts to draw on screen using the print class
  // >>>>>>>>>>>>>>>>>>>>>>>>>>>>>>>>>>>>>>>>>>>>>>>>>>>>>>>>>>>>>>>>>>>>>>>>>>>>>>>>>

  header("Using print() method", TFT_NAVY);

  // For comaptibility with Adafruit_GFX library the text background is not plotted when using the print class
  // even if we specify it.
  tft.setTextColor(TFT_YELLOW);
  tft.setCursor(xpos, ypos);    // Set cursor near top left corner of screen

  tft.setFreeFont(TT1);     // Select the orginal small TomThumb font
  tft.println();             // Move cursor down a line
  tft.print("The really tiny TomThumb font");    // Print the font name onto the TFT screen
  tft.println();
  tft.println();

  tft.setFreeFont(FSB9);   // Select Free Serif 9 point font, could use:
  // tft.setFreeFont(&FreeSerif9pt7b);
  tft.println();          // Free fonts plot with the baseline (imaginary line the letter A would sit on)
  // as the datum, so we must move the cursor down a line from the 0,0 position
  tft.print("Serif Bold 9pt");  // Print the font name onto the TFT screen

  tft.setFreeFont(FSB12);       // Select Free Serif 12 point font
  tft.println();                // Move cursor down a line
  tft.print("Serif Bold 12pt"); // Print the font name onto the TFT screen

  tft.setFreeFont(FSB18);       // Select Free Serif 12 point font
  tft.println();                // Move cursor down a line
  tft.print("Serif Bold 18pt"); // Print the font name onto the TFT screen

  tft.setFreeFont(FSB24);       // Select Free Serif 24 point font
  tft.println();                // Move cursor down a line
  tft.print("Serif Bold 24pt"); // Print the font name onto the TFT screen


  delay(4000);

  // >>>>>>>>>>>>>>>>>>>>>>>>>>>>>>>>>>>>>>>>>>>>>>>>>>>>>>>>>>>>>>>>>>>>>>>>>>>>>>>>>
  // Now use drawString() so we can set font background colours and the datum
  // >>>>>>>>>>>>>>>>>>>>>>>>>>>>>>>>>>>>>>>>>>>>>>>>>>>>>>>>>>>>>>>>>>>>>>>>>>>>>>>>>

  header("Using drawString()", TFT_BLACK);

  tft.setTextColor(TFT_WHITE, TFT_BLACK);

  tft.setTextDatum(TC_DATUM); // Centre text on x,y position

  xpos = tft.width() / 2; // Half the screen width
  ypos = 50;

  tft.setFreeFont(FSB9);                              // Select the font
  tft.drawString("Serif Bold 9pt", xpos, ypos, GFXFF);  // Draw the text string in the selected GFX free font
  ypos += tft.fontHeight(GFXFF);                      // Get the font height and move ypos down

  tft.setFreeFont(FSB12);
  tft.drawString("Serif Bold 12pt", xpos, ypos, GFXFF);
  ypos += tft.fontHeight(GFXFF);

  tft.setFreeFont(FSB18);
  tft.drawString("Serif Bold 18pt", xpos, ypos, GFXFF);
  ypos += tft.fontHeight(GFXFF);

  tft.setFreeFont(FSB24);
  tft.drawString("Serif Bold 24pt", xpos, ypos, GFXFF);
  ypos += tft.fontHeight(GFXFF);

  // Set text padding to 100 pixels wide area to over-write old values on screen
  tft.setTextPadding(100);
  for (int i = 0; i <= 20; i++) {
    tft.drawFloat(i / 10.0, 1, xpos, ypos, GFXFF);
    delay (200);
  }

  delay(4000);

  // >>>>>>>>>>>>>>>>>>>>>>>>>>>>>>>>>>>>>>>>>>>>>>>>>>>>>>>>>>>>>>>>>>>>>>>>>>>>>>>>>
  // Same again but with colours that show bounding boxes
  // >>>>>>>>>>>>>>>>>>>>>>>>>>>>>>>>>>>>>>>>>>>>>>>>>>>>>>>>>>>>>>>>>>>>>>>>>>>>>>>>>


  header("With background", TFT_DARKGREY);

  tft.setTextColor(TFT_YELLOW, TFT_BLACK);

  tft.setTextDatum(TC_DATUM); // Centre text on x,y position

  xpos = tft.width() / 2; // Half the screen width
  ypos = 50;

  tft.setFreeFont(FSB9);                              // Select the font
  tft.drawString("Serif Bold 9pt", xpos, ypos, GFXFF);  // Draw the text string in the selected GFX free font
  ypos += tft.fontHeight(GFXFF);                        // Get the font height and move ypos down

  tft.setFreeFont(FSB12);
  tft.drawString("Serif Bold 12pt", xpos, ypos, GFXFF);
  ypos += tft.fontHeight(GFXFF);

  tft.setFreeFont(FSB18);
  tft.drawString("Serif Bold 18pt", xpos, ypos, GFXFF);
  ypos += tft.fontHeight(GFXFF);

  tft.setFreeFont(FSBI24);
  tft.drawString("Bold Italic 24pt", xpos, ypos, GFXFF);
  ypos += tft.fontHeight(GFXFF);

  // Set text padding to 100 pixels wide area to over-write old values on screen
  tft.setTextPadding(100);
  for (int i = 0; i <= 20; i++) {
    tft.drawFloat(i / 10.0, 1, xpos, ypos, GFXFF);
    delay (200);
  }

  delay(4000);

  // >>>>>>>>>>>>>>>>>>>>>>>>>>>>>>>>>>>>>>>>>>>>>>>>>>>>>>>>>>>>>>>>>>>>>>>>>>>>>>>>>
  // Now show setting the 12 datum positions works with free fonts
  // >>>>>>>>>>>>>>>>>>>>>>>>>>>>>>>>>>>>>>>>>>>>>>>>>>>>>>>>>>>>>>>>>>>>>>>>>>>>>>>>>

  // Numbers, floats and strings can be drawn relative to a datum
  header("Text with a datum", TFT_BLACK);
  tft.setTextColor(TFT_DARKGREY, TFT_BLACK);
  tft.setFreeFont(FSS12);
  tft.setTextDatum(TL_DATUM);
  tft.drawString("[Top left]", 160, 120, GFXFF);
  drawDatumMarker(160,120);
  delay(1000);

  tft.fillRect(0, 80, 320, 80, TFT_BLACK);
  tft.setTextDatum(TC_DATUM);
  tft.drawString("[Top centre]", 160, 120, GFXFF);
  drawDatumMarker(160,120);
  delay(1000);

  tft.fillRect(0, 80, 320, 80, TFT_BLACK);
  tft.setTextDatum(TR_DATUM);
  tft.drawString("[Top right]", 160, 120, GFXFF);
  drawDatumMarker(160,120);
  delay(1000);

  tft.fillRect(0, 80, 320, 80, TFT_BLACK);
  tft.setTextDatum(ML_DATUM);
  tft.drawString("[Middle left]", 160, 120, GFXFF);
  drawDatumMarker(160,120);
  delay(1000);

  tft.fillRect(0, 80, 320, 80, TFT_BLACK);
  tft.setTextDatum(MC_DATUM);
  tft.drawString("[Middle centre]", 160, 120, GFXFF);
  drawDatumMarker(160,120);
  delay(1000);

  tft.fillRect(0, 80, 320, 80, TFT_BLACK);
  tft.setTextDatum(MR_DATUM);
  tft.drawString("[Middle right]", 160, 120, GFXFF);
  drawDatumMarker(160,120);
  delay(1000);

  tft.fillRect(0, 80, 320, 80, TFT_BLACK);
  tft.setTextDatum(BL_DATUM);
  tft.drawString("[Bottom left]", 160, 120, GFXFF);
  drawDatumMarker(160,120);
  delay(1000);

  tft.fillRect(0, 80, 320, 80, TFT_BLACK);
  tft.setTextDatum(BC_DATUM);
  tft.drawString("[Bottom centre]", 160, 120, GFXFF);
  drawDatumMarker(160,120);
  delay(1000);

  tft.fillRect(0, 80, 320, 80, TFT_BLACK);
  tft.setTextDatum(BR_DATUM);
  tft.drawString("[Bottom right]", 160, 120, GFXFF);
  drawDatumMarker(160,120);
  delay(1000);

  tft.fillRect(0, 80, 320, 80, TFT_BLACK);
  tft.setTextDatum(L_BASELINE);
  tft.drawString("[Left baseline]", 160, 120, GFXFF);
  drawDatumMarker(160,120);
  delay(1000);

  tft.fillRect(0, 80, 320, 80, TFT_BLACK);
  tft.setTextDatum(C_BASELINE);
  tft.drawString("[Centre baseline]", 160, 120, GFXFF);
  drawDatumMarker(160,120);
  delay(1000);

  tft.fillRect(0, 80, 320, 80, TFT_BLACK);
  tft.setTextDatum(R_BASELINE);
  tft.drawString("[Right baseline]", 160, 120, GFXFF);
  drawDatumMarker(160,120);
  delay(1000);

  //while(1);
  delay(8000);

}

// Print the header for a display screen
void header(const char *string, uint16_t color)
{
  tft.fillScreen(color);
  tft.setTextSize(1);
  tft.setTextColor(TFT_MAGENTA, TFT_BLUE);
  tft.fillRect(0, 0, 320, 30, TFT_BLUE);
  tft.setTextDatum(TC_DATUM);
  tft.drawString(string, 160, 2, 4); // Font 4 for fast drawing with background
}

// Draw a + mark centred on x,y
void drawDatumMarker(int x, int y)
{
  tft.drawLine(x - 5, y, x + 5, y, TFT_GREEN);
  tft.drawLine(x, y - 5, x, y + 5, TFT_GREEN);
}


// There follows a crude way of flagging that this example sketch needs fonts which
// have not been enabled in the User_Setup.h file inside the TFT_HX8357 library.
//
// These lines produce errors during compile time if settings in User_Setup are not correct
//
// The error will be "does not name a type" but ignore this and read the text between ''
// it will indicate which font or feature needs to be enabled
//
// Either delete all the following lines if you do not want warnings, or change the lines
// to suit your sketch modifications.

#ifndef LOAD_GLCD
//ERROR_Please_enable_LOAD_GLCD_in_User_Setup
#endif

#ifndef LOAD_FONT2
//ERROR_Please_enable_LOAD_FONT2_in_User_Setup!
#endif

#ifndef LOAD_FONT4
//ERROR_Please_enable_LOAD_FONT4_in_User_Setup!
#endif

#ifndef LOAD_FONT6
//ERROR_Please_enable_LOAD_FONT6_in_User_Setup!
#endif

#ifndef LOAD_FONT7
//ERROR_Please_enable_LOAD_FONT7_in_User_Setup!
#endif

#ifndef LOAD_FONT8
//ERROR_Please_enable_LOAD_FONT8_in_User_Setup!
#endif

#ifndef LOAD_GFXFF
ERROR_Please_enable_LOAD_GFXFF_in_User_Setup!
#endif
初期設定
- 41,42,47行 "TFT_eSPI" を使う時のお決まり。
- 44行 フォントデータの読み込み。データはSDカードでは無くスケッチ内に定義されています。
- 53行 tft.begin();
- ここでUser_Setup.hに従って初期化が行われます。
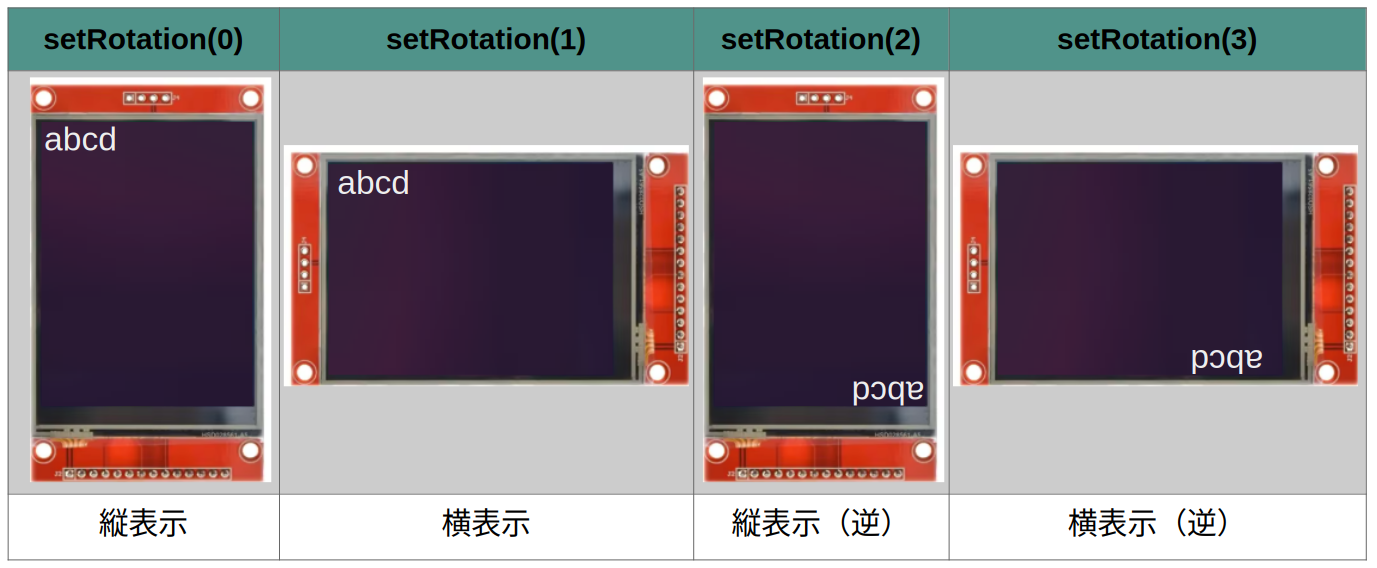
- 55行 tft.setRotation(1);
- 画面の表示モードを指定します。
- 引数の値により画面の表示方向が下記の様に設定されます。引数は 0,1,2,3の4個。
- 前回紹介した画面のコピー関数 "get_img()" の最初の引数はこの値です。
- tft.setRotation(1); としているので横表示となります。
デモ1
- 68行 デモ1の始まり。
- このデモは以下を実行。
- println()で改行。引数が無い時は改行のみ実行。
- 表示位置が左端となったところでprint()を実行。
- 上記をフォントサイズを変更して繰り返す。
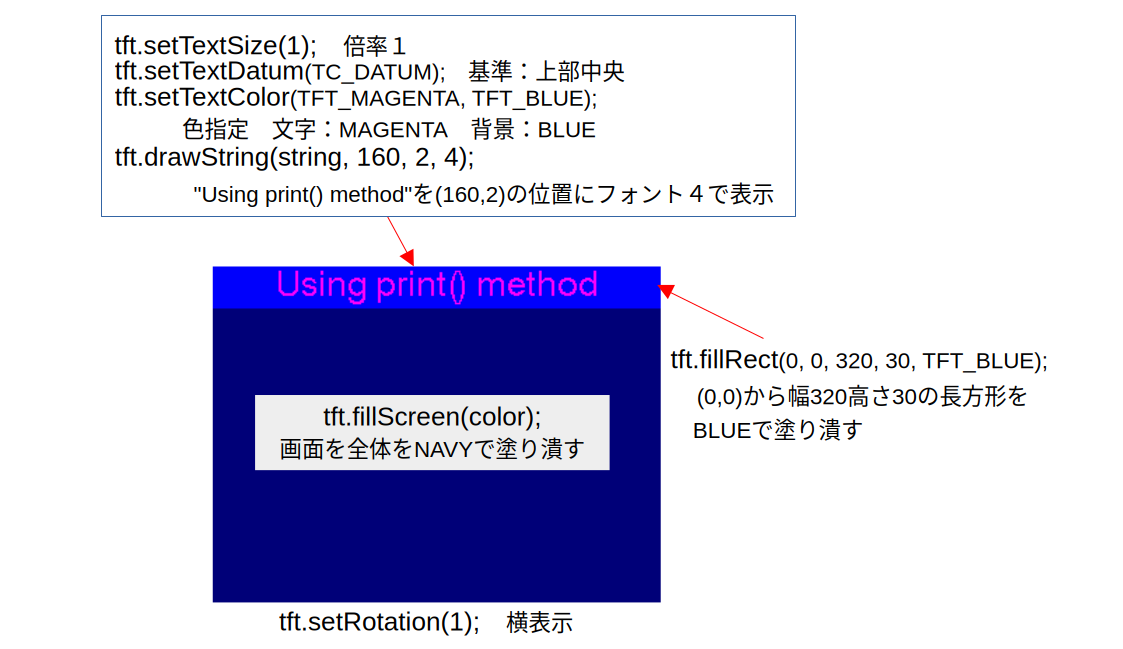
- 先ずは header()264行へ飛ぶ
- 264行 ここから画面のヘッダーを描きます。
- 266行 tft.fillScreen(color);
- 画面全体を指定した色で塗り潰す。
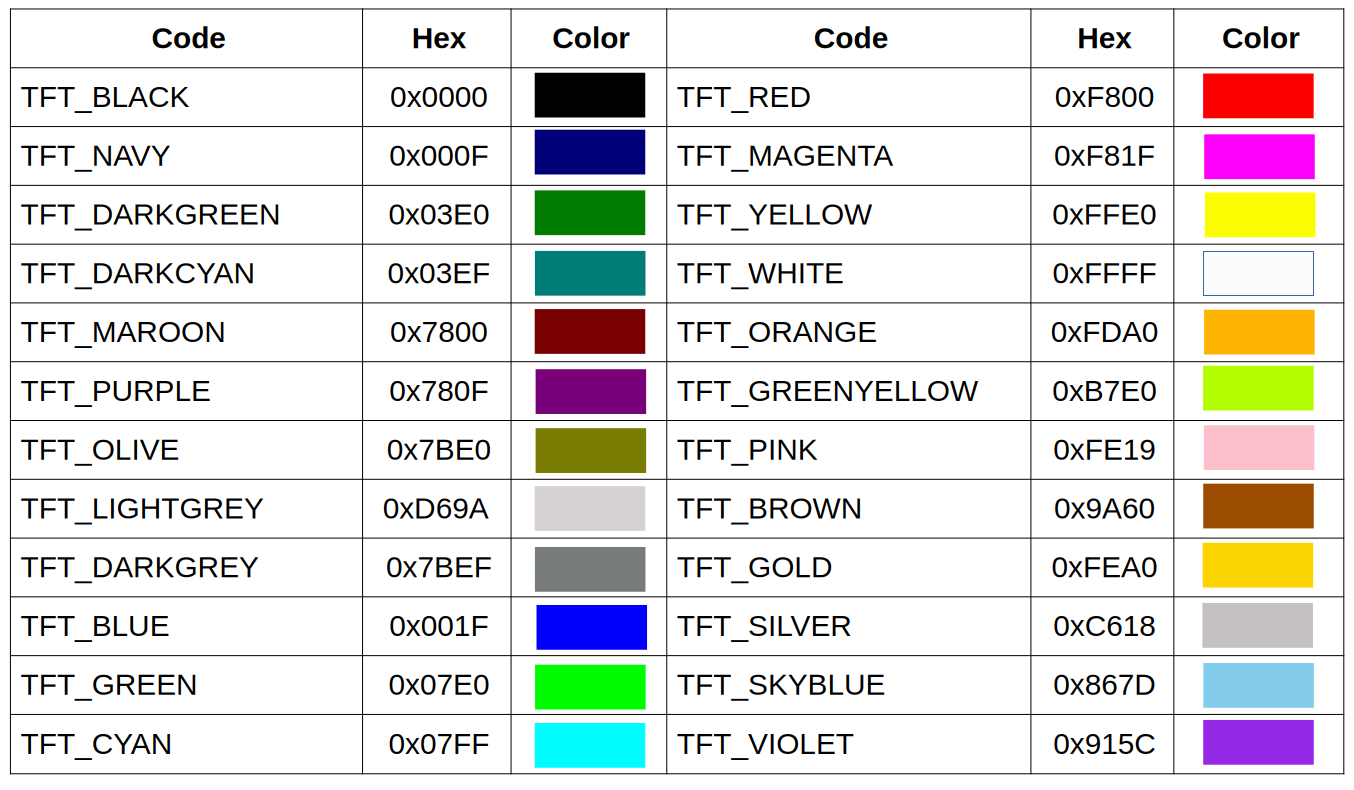
- TFT_eSPIは色を16ビット(R:5/G:6/B:5)カラーで指定します。
- 色は予め下記の24色が登録されています。
- これ以外の色も引数に指定する事により表示出来ます。
- 267行 tft.setTextSize(1);
- フォントの倍率を指定する関数。
- 引数は1から7までの7つ。等倍から7倍までフォントを拡大出来ます。
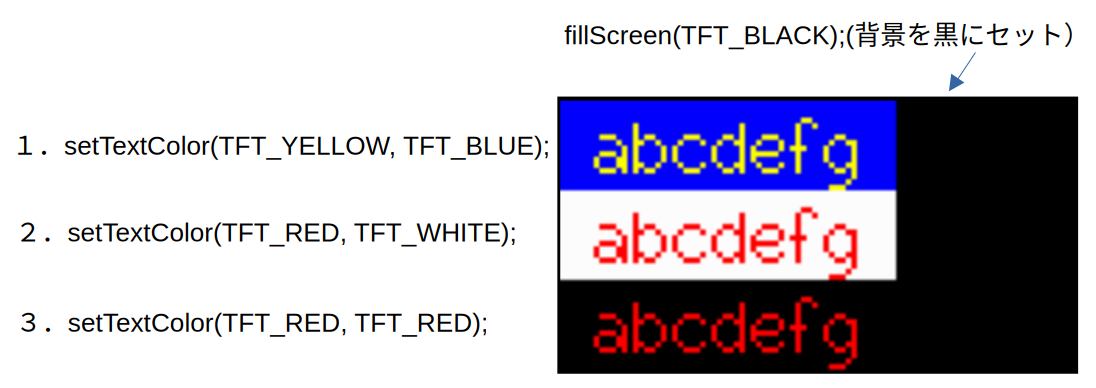
- 268行 tft.setTextColor(TFT_MAGENTA, TFT_BLUE);
- 文字とその背景の色を指定する。
- 最初の引数が文字、次が背景です。色は16ビットで指定。
- 文字と背景を同じ色または文字の色のみ指定すると背景が透明扱いになります。
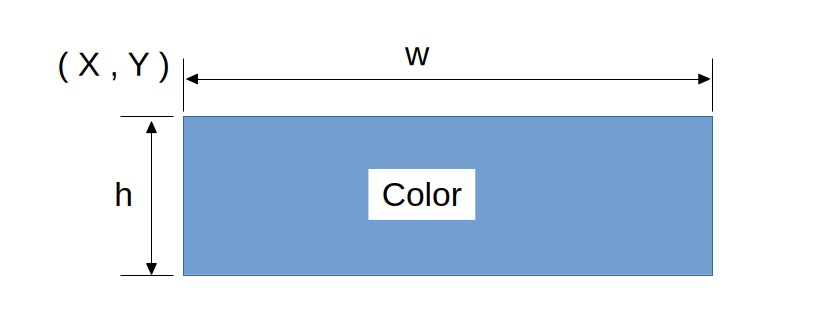
- 269行 tft.fillRect(0, 0, 320, 30, TFT_BLUE);
- 指定した長方形の範囲を塗り潰す関数。
- fillRect(X, Y, w, h, Color); と指定すると以下の様になります。
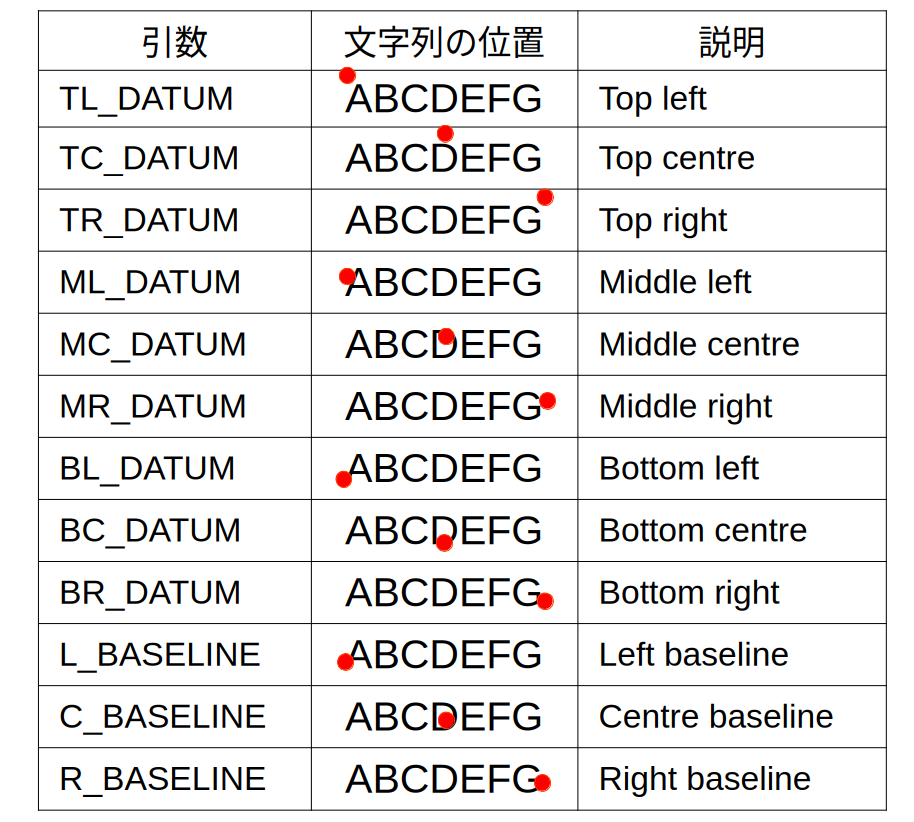
- 270行 tft.setTextDatum
- 文字列の表示基準位置を引数で指定。12箇所の指定が可能。
- 引数と表示基準位置の関係は以下の通り。赤丸が表示基準位置。
- 271行 tft.drawString(string, 160, 2, 4);
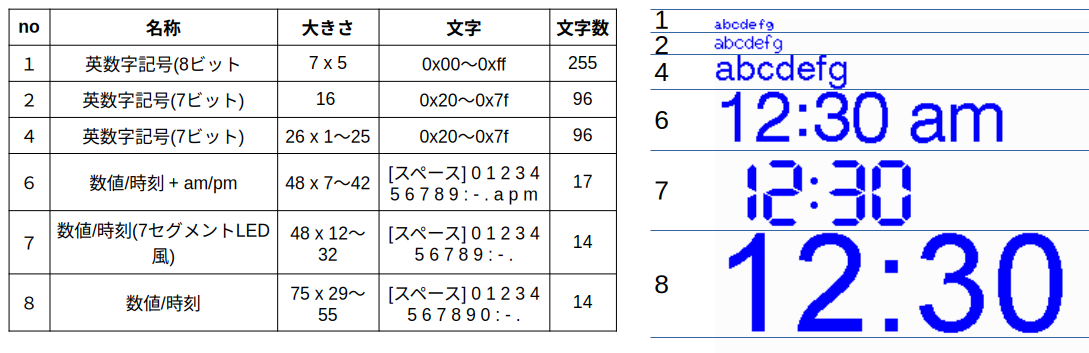
- 文字列を表示する関数。
- 6種類のデフォルトフォントが有る。それらを文字コードで指定。
- 下記は文字コード1,2,4,6,7,8の詳細。
- ここまでで画面は以下の様になり、デモ1に戻ります。
- 72行 tft.setTextColor(TFT_YELLOW);
- 文字の色のみ指定したケース。背景は透明扱いになる。
- 73行 tft.setCursor(xpos, ypos);
- カーソルの開始位置(座標)
- 基準は左上が(0,0)
- 75行 tft.setFreeFont(TT1);
- デフォルト6種類のフォント以外のフォントを指定する時に使う関数。
- デフォルト以外のフォントを予め登録しておけばそれを使用出来ます。
- デモプログラムでは ”Free_Fonts.h” で登録しています。
- 76行 tft.println();
- 改行を伴った文字列表示関数。Arduino標準の Serial.println() と使い方はほぼ同じ。
- tft.setCursor(xpos, ypos);で表示開始位置を指定。
- その時点で使用しているフォントの高さに合わせて改行します。(左に寄る)
- 77行 tft.print();
- 文字列表示関数。Arduino標準の Serial.print() と使い方はほぼ同じ。
- tft.setCursor(xpos, ypos);で表示開始位置を指定。
- このデモは以下を実行。
デモ2
- 106行 デモ2の始まり。ここでは
- 画面を黒塗り
- 文字を白、背景を黒に設定
- Xの位置を画面水平方向の半分。Yを50に設定
- フォントを9,12,18,24と変更し、その都度高さを求めて改行
- 最後に少数をPaddingを用いて表示
- 112行 tft.width();
- 表示モードの水平方向の解像度を返す関数。
- 垂直方向の解像度を返す関数は tft.height()
- 116行 tft.drawString("Serif Bold 9pt", xpos, ypos, GFXFF);
- Free_Fontの場合最後の引数がGFXFFとなる。
- 117行 tft.fontHeight(GFXFF);
- 引数で指定されたフォントの高さを返す関数。
- 132行 tft.setTextPadding(100);
- 引数で指定した幅と現在使用しているフォントの高さの領域を消去。
- 直前に書かれた文字を消す場合に使用。
- 134行 tft.drawFloat(i / 10.0, 1, xpos, ypos, GFXFF);
- 浮動小数を表示する関数
- 引数は 浮動少数、少数の桁数、x座標、y座標、文字コード
- 少数の桁は7桁まで
デモ3
- 145行 デモ3の始まり。
- 画面とフォントの背景色を変えてフォントの境界を表示。
- その他はデモ2と同じ。
デモ4
- 184行 デモ4の始まり。文字列を表示基準を変えて表示しています。
- 189行 drawDatumMarker(160,120);
- 画面上の指定した座標 (x, y)に小さな十字マーク
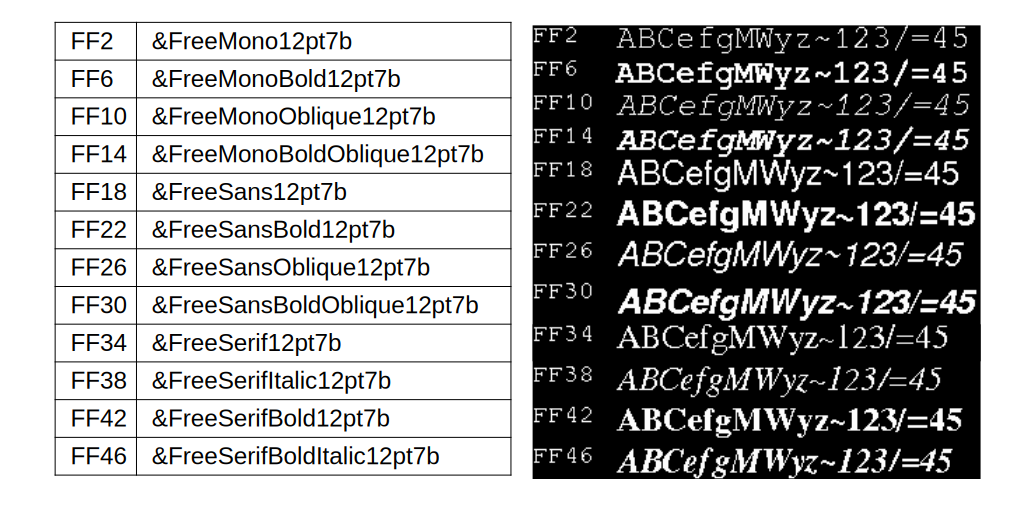
登録されているFree_Font
登録されているFree_Font(12ドット)を表示して見ました。
次回は
次回は、KeyPad_240x320.ino を説明する予定です。