概要
今回はKeypad_240x320です。スケッチの場所はファイルー>スケッチ例ー>TFT_eSPIー>320×240ー>Keypad_240x320です。 このデモは、タッチセンサーと GUI のボタンの説明が主です。
/*
The TFT_eSPI library incorporates an Adafruit_GFX compatible
button handling class, this sketch is based on the Arduin-o-phone
example.
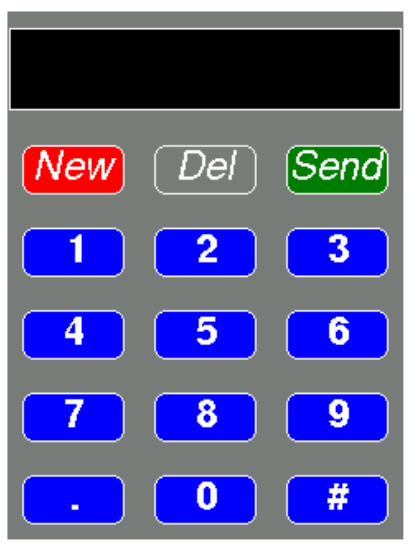
This example displays a keypad where numbers can be entered and
sent to the Serial Monitor window.
The sketch has been tested on the ESP8266 (which supports SPIFFS)
The minimum screen size is 320 x 240 as that is the keypad size.
*/
// The SPIFFS (FLASH filing system) is used to hold touch screen
// calibration data
#include "FS.h"
#include <SPI.h>
#include <TFT_eSPI.h> // Hardware-specific library
TFT_eSPI tft = TFT_eSPI(); // Invoke custom library
// This is the file name used to store the calibration data
// You can change this to create new calibration files.
// The SPIFFS file name must start with "/".
#define CALIBRATION_FILE "/TouchCalData1"
// Set REPEAT_CAL to true instead of false to run calibration
// again, otherwise it will only be done once.
// Repeat calibration if you change the screen rotation.
#define REPEAT_CAL false
// Keypad start position, key sizes and spacing
#define KEY_X 40 // Centre of key
#define KEY_Y 96
#define KEY_W 62 // Width and height
#define KEY_H 30
#define KEY_SPACING_X 18 // X and Y gap
#define KEY_SPACING_Y 20
#define KEY_TEXTSIZE 1 // Font size multiplier
// Using two fonts since numbers are nice when bold
#define LABEL1_FONT &FreeSansOblique12pt7b // Key label font 1
#define LABEL2_FONT &FreeSansBold12pt7b // Key label font 2
// Numeric display box size and location
#define DISP_X 1
#define DISP_Y 10
#define DISP_W 238
#define DISP_H 50
#define DISP_TSIZE 3
#define DISP_TCOLOR TFT_CYAN
// Number length, buffer for storing it and character index
#define NUM_LEN 12
char numberBuffer[NUM_LEN + 1] = "";
uint8_t numberIndex = 0;
// We have a status line for messages
#define STATUS_X 120 // Centred on this
#define STATUS_Y 65
// Create 15 keys for the keypad
char keyLabel[15][5] = {"New", "Del", "Send", "1", "2", "3", "4", "5", "6", "7", "8", "9", ".", "0", "#" };
uint16_t keyColor[15] = {TFT_RED, TFT_DARKGREY, TFT_DARKGREEN,
TFT_BLUE, TFT_BLUE, TFT_BLUE,
TFT_BLUE, TFT_BLUE, TFT_BLUE,
TFT_BLUE, TFT_BLUE, TFT_BLUE,
TFT_BLUE, TFT_BLUE, TFT_BLUE
};
// Invoke the TFT_eSPI button class and create all the button objects
TFT_eSPI_Button key[15];
//------------------------------------------------------------------------------------------
void setup() {
// Use serial port
Serial.begin(9600);
// Initialise the TFT screen
tft.init();
// Set the rotation before we calibrate
tft.setRotation(0);
// Calibrate the touch screen and retrieve the scaling factors
touch_calibrate();
// Clear the screen
tft.fillScreen(TFT_BLACK);
// Draw keypad background
tft.fillRect(0, 0, 240, 320, TFT_DARKGREY);
// Draw number display area and frame
tft.fillRect(DISP_X, DISP_Y, DISP_W, DISP_H, TFT_BLACK);
tft.drawRect(DISP_X, DISP_Y, DISP_W, DISP_H, TFT_WHITE);
// Draw keypad
drawKeypad();
}
//------------------------------------------------------------------------------------------
void loop(void) {
uint16_t t_x = 0, t_y = 0; // To store the touch coordinates
// Pressed will be set true is there is a valid touch on the screen
bool pressed = tft.getTouch(&t_x, &t_y);
// / Check if any key coordinate boxes contain the touch coordinates
for (uint8_t b = 0; b < 15; b++) {
if (pressed && key[b].contains(t_x, t_y)) {
key[b].press(true); // tell the button it is pressed
} else {
key[b].press(false); // tell the button it is NOT pressed
}
}
// Check if any key has changed state
for (uint8_t b = 0; b < 15; b++) {
if (b < 3) tft.setFreeFont(LABEL1_FONT);
else tft.setFreeFont(LABEL2_FONT);
if (key[b].justReleased()) key[b].drawButton(); // draw normal
if (key[b].justPressed()) {
key[b].drawButton(true); // draw invert
// if a numberpad button, append the relevant # to the numberBuffer
if (b >= 3) {
if (numberIndex < NUM_LEN) {
numberBuffer[numberIndex] = keyLabel[b][0];
numberIndex++;
numberBuffer[numberIndex] = 0; // zero terminate
}
status(""); // Clear the old status
}
// Del button, so delete last char
if (b == 1) {
numberBuffer[numberIndex] = 0;
if (numberIndex > 0) {
numberIndex--;
numberBuffer[numberIndex] = 0;//' ';
}
status(""); // Clear the old status
}
if (b == 2) {
status("Sent value to serial port");
Serial.println(numberBuffer);
}
// we dont really check that the text field makes sense
// just try to call
if (b == 0) {
status("Value cleared");
numberIndex = 0; // Reset index to 0
numberBuffer[numberIndex] = 0; // Place null in buffer
}
// Update the number display field
tft.setTextDatum(TL_DATUM); // Use top left corner as text coord datum
tft.setFreeFont(&FreeSans18pt7b); // Choose a nice font that fits box
tft.setTextColor(DISP_TCOLOR); // Set the font colour
// Draw the string, the value returned is the width in pixels
int xwidth = tft.drawString(numberBuffer, DISP_X + 4, DISP_Y + 12);
// Now cover up the rest of the line up by drawing a black rectangle. No flicker this way
// but it will not work with italic or oblique fonts due to character overlap.
tft.fillRect(DISP_X + 4 + xwidth, DISP_Y + 1, DISP_W - xwidth - 5, DISP_H - 2, TFT_BLACK);
delay(10); // UI debouncing
}
}
}
//------------------------------------------------------------------------------------------
void drawKeypad()
{
// Draw the keys
for (uint8_t row = 0; row < 5; row++) {
for (uint8_t col = 0; col < 3; col++) {
uint8_t b = col + row * 3;
if (b < 3) tft.setFreeFont(LABEL1_FONT);
else tft.setFreeFont(LABEL2_FONT);
key[b].initButton(&tft, KEY_X + col * (KEY_W + KEY_SPACING_X),
KEY_Y + row * (KEY_H + KEY_SPACING_Y), // x, y, w, h, outline, fill, text
KEY_W, KEY_H, TFT_WHITE, keyColor[b], TFT_WHITE,
keyLabel[b], KEY_TEXTSIZE);
key[b].drawButton();
}
}
}
//------------------------------------------------------------------------------------------
void touch_calibrate()
{
uint16_t calData[5];
uint8_t calDataOK = 0;
// check file system exists
if (!SPIFFS.begin()) {
Serial.println("formatting file system");
SPIFFS.format();
SPIFFS.begin();
}
// check if calibration file exists and size is correct
if (SPIFFS.exists(CALIBRATION_FILE)) {
if (REPEAT_CAL)
{
// Delete if we want to re-calibrate
SPIFFS.remove(CALIBRATION_FILE);
}
else
{
File f = SPIFFS.open(CALIBRATION_FILE, "r");
if (f) {
if (f.readBytes((char *)calData, 14) == 14)
calDataOK = 1;
f.close();
}
}
}
if (calDataOK && !REPEAT_CAL) {
// calibration data valid
tft.setTouch(calData);
} else {
// data not valid so recalibrate
tft.fillScreen(TFT_BLACK);
tft.setCursor(20, 0);
tft.setTextFont(2);
tft.setTextSize(1);
tft.setTextColor(TFT_WHITE, TFT_BLACK);
tft.println("Touch corners as indicated");
tft.setTextFont(1);
tft.println();
if (REPEAT_CAL) {
tft.setTextColor(TFT_RED, TFT_BLACK);
tft.println("Set REPEAT_CAL to false to stop this running again!");
}
tft.calibrateTouch(calData, TFT_MAGENTA, TFT_BLACK, 15);
tft.setTextColor(TFT_GREEN, TFT_BLACK);
tft.println("Calibration complete!");
// store data
File f = SPIFFS.open(CALIBRATION_FILE, "w");
if (f) {
f.write((const unsigned char *)calData, 14);
f.close();
}
}
}
//------------------------------------------------------------------------------------------
// Print something in the mini status bar
void status(const char *msg) {
tft.setTextPadding(240);
//tft.setCursor(STATUS_X, STATUS_Y);
tft.setTextColor(TFT_WHITE, TFT_DARKGREY);
tft.setTextFont(0);
tft.setTextDatum(TC_DATUM);
tft.setTextSize(1);
tft.drawString(msg, STATUS_X, STATUS_Y);
}
//------------------------------------------------------------------------------------------
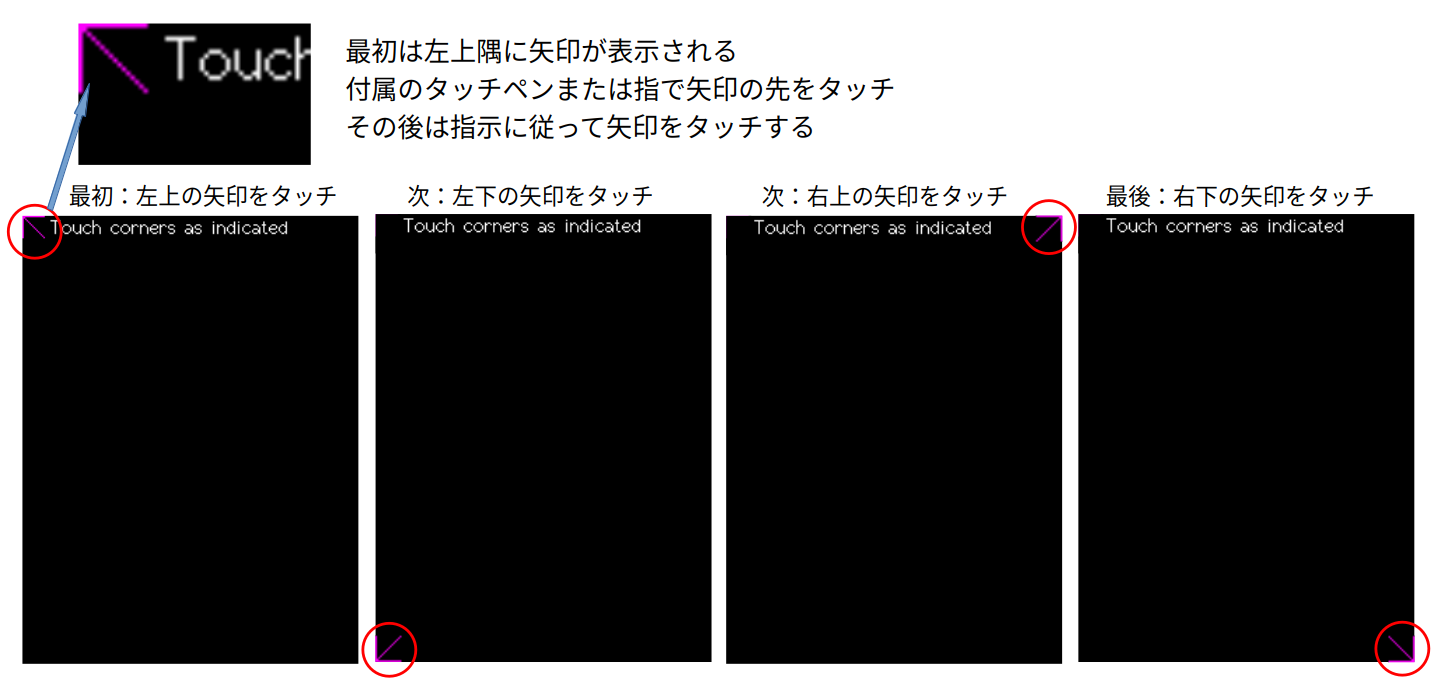
タッチセンサにはキャリブレーションが必要
タッチセンサを使う前にセンサのキャリブレーションが必要です。これを行わないとタッチセンサが正しく動作しません。 関数 "touch_calibrate()" がキャリブレーションを担当しています。 この関数を実行すると画面の端に矢印が表示され、その矢印に触りながらキャリブレーションを行います。
- 関数 "touch_calibrate()" はプログラムの205行目から。
- このスケッチはCALIBRATION_FILE(“TouchCalData1″)の有無により下記の動作を行います。
- ファイル有り:データをファイルより読み込みキャリブレーション完了。
- ファイル無し:キャリブレーション操作(4隅を触る)を行いデータをファイルに保存して完了。
- 4隅を触るキャリブレーションがコンパイル後の1回のみ行われるのはこの為です。
- この関数は自作製品でタッチセンサーを使う時に便利に使えそうです。
関数と色一覧
キャリブレーションの次は図形の描写
tft.fillRect(DISP_X, DISP_Y, DISP_W, DISP_H, TFT_BLACK);
tft.drawRect(DISP_X, DISP_Y, DISP_W, DISP_H, TFT_WHITE);
等の関数が続きます。
これら関数の一覧が "/Arduino/libraries/TFT_eSPI/TFT_eSPI.h" に有ります。
  // These are virtual so the TFT_eSprite class can override them with sprite specific functions
  virtual void     drawPixel(int32_t x, int32_t y, uint32_t color),
                   drawChar(int32_t x, int32_t y, uint16_t c, uint32_t color, uint32_t bg, uint8_t size),
                   drawLine(int32_t xs, int32_t ys, int32_t xe, int32_t ye, uint32_t color),
                   drawFastVLine(int32_t x, int32_t y, int32_t h, uint32_t color),
                   drawFastHLine(int32_t x, int32_t y, int32_t w, uint32_t color),
                   fillRect(int32_t x, int32_t y, int32_t w, int32_t h, uint32_t color);

  virtual int16_t  drawChar(uint16_t uniCode, int32_t x, int32_t y, uint8_t font),
                   drawChar(uint16_t uniCode, int32_t x, int32_t y),
                   height(void),
                   width(void);

                   // Read the colour of a pixel at x,y and return value in 565 format
  virtual uint16_t readPixel(int32_t x, int32_t y);

  virtual void     setWindow(int32_t xs, int32_t ys, int32_t xe, int32_t ye);   // Note: start + end coordinates

                   // Push (aka write pixel) colours to the set window
  virtual void     pushColor(uint16_t color);

                   // These are non-inlined to enable override
  virtual void     begin_nin_write();
  virtual void     end_nin_write();

  void     setRotation(uint8_t r); // Set the display image orientation to 0, 1, 2 or 3
  uint8_t  getRotation(void);      // Read the current rotation

  // Change the origin position from the default top left
  // Note: setRotation, setViewport and resetViewport will revert origin to top left corner of screen/sprite
  void     setOrigin(int32_t x, int32_t y);
  int32_t  getOriginX(void);
  int32_t  getOriginY(void);

  void     invertDisplay(bool i);  // Tell TFT to invert all displayed colours


  // The TFT_eSprite class inherits the following functions (not all are useful to Sprite class
  void     setAddrWindow(int32_t xs, int32_t ys, int32_t w, int32_t h); // Note: start coordinates + width and height

  // Viewport commands, see "Viewport_Demo" sketch
  void     setViewport(int32_t x, int32_t y, int32_t w, int32_t h, bool vpDatum = true);
  bool     checkViewport(int32_t x, int32_t y, int32_t w, int32_t h);
  int32_t  getViewportX(void);
  int32_t  getViewportY(void);
  int32_t  getViewportWidth(void);
  int32_t  getViewportHeight(void);
  bool     getViewportDatum(void);
  void     frameViewport(uint16_t color, int32_t w);
  void     resetViewport(void);

           // Clip input window to viewport bounds, return false if whole area is out of bounds
  bool     clipAddrWindow(int32_t* x, int32_t* y, int32_t* w, int32_t* h);
           // Clip input window area to viewport bounds, return false if whole area is out of bounds
  bool     clipWindow(int32_t* xs, int32_t* ys, int32_t* xe, int32_t* ye);

           // Push (aka write pixel) colours to the TFT (use setAddrWindow() first)
  void     pushColor(uint16_t color, uint32_t len),  // Deprecated, use pushBlock()
           pushColors(uint16_t  *data, uint32_t len, bool swap = true), // With byte swap option
           pushColors(uint8_t  *data, uint32_t len); // Deprecated, use pushPixels()

           // Write a solid block of a single colour
  void     pushBlock(uint16_t color, uint32_t len);

           // Write a set of pixels stored in memory, use setSwapBytes(true/false) function to correct endianess
  void     pushPixels(const void * data_in, uint32_t len);

           // Support for half duplex (bi-directional SDA) SPI bus where MOSI must be switched to input
           #ifdef TFT_SDA_READ
             #if defined (TFT_eSPI_ENABLE_8_BIT_READ)
  uint8_t  tft_Read_8(void);     // Read 8-bit value from TFT command register
             #endif
  void     begin_SDA_Read(void); // Begin a read on a half duplex (bi-directional SDA) SPI bus - sets MOSI to input
  void     end_SDA_Read(void);   // Restore MOSI to output
           #endif


  // Graphics drawing
  void     fillScreen(uint32_t color),
           drawRect(int32_t x, int32_t y, int32_t w, int32_t h, uint32_t color),
           drawRoundRect(int32_t x, int32_t y, int32_t w, int32_t h, int32_t radius, uint32_t color),
           fillRoundRect(int32_t x, int32_t y, int32_t w, int32_t h, int32_t radius, uint32_t color);

  void     fillRectVGradient(int16_t x, int16_t y, int16_t w, int16_t h, uint32_t color1, uint32_t color2);
  void     fillRectHGradient(int16_t x, int16_t y, int16_t w, int16_t h, uint32_t color1, uint32_t color2);

  void     drawCircle(int32_t x, int32_t y, int32_t r, uint32_t color),
           drawCircleHelper(int32_t x, int32_t y, int32_t r, uint8_t cornername, uint32_t color),
           fillCircle(int32_t x, int32_t y, int32_t r, uint32_t color),
           fillCircleHelper(int32_t x, int32_t y, int32_t r, uint8_t cornername, int32_t delta, uint32_t color),

           drawEllipse(int16_t x, int16_t y, int32_t rx, int32_t ry, uint16_t color),
           fillEllipse(int16_t x, int16_t y, int32_t rx, int32_t ry, uint16_t color),

           //                 Corner 1               Corner 2               Corner 3
           drawTriangle(int32_t x1,int32_t y1, int32_t x2,int32_t y2, int32_t x3,int32_t y3, uint32_t color),
           fillTriangle(int32_t x1,int32_t y1, int32_t x2,int32_t y2, int32_t x3,int32_t y3, uint32_t color);
上記はその一部です。このリストを元に大半の関数のおおよその機能を予測出来ます。
tft.fillRect(DISP_X, DISP_Y, DISP_W, DISP_H, TFT_BLACK); は長方形の塗り潰し。
tft.drawRect(DISP_X, DISP_Y, DISP_W, DISP_H, TFT_WHITE); は枠のみの長方形を描写。
登録されている24色の一覧も "TFT_eSPI.h" に有ります。
/***************************************************************************************
**                         Section 6: Colour enumeration
***************************************************************************************/
// Default color definitions
#define TFT_BLACK       0x0000      /*   0,   0,   0 */
#define TFT_NAVY        0x000F      /*   0,   0, 128 */
#define TFT_DARKGREEN   0x03E0      /*   0, 128,   0 */
#define TFT_DARKCYAN    0x03EF      /*   0, 128, 128 */
#define TFT_MAROON      0x7800      /* 128,   0,   0 */
#define TFT_PURPLE      0x780F      /* 128,   0, 128 */
#define TFT_OLIVE       0x7BE0      /* 128, 128,   0 */
#define TFT_LIGHTGREY   0xD69A      /* 211, 211, 211 */
#define TFT_DARKGREY    0x7BEF      /* 128, 128, 128 */
#define TFT_BLUE        0x001F      /*   0,   0, 255 */
#define TFT_GREEN       0x07E0      /*   0, 255,   0 */
#define TFT_CYAN        0x07FF      /*   0, 255, 255 */
#define TFT_RED         0xF800      /* 255,   0,   0 */
#define TFT_MAGENTA     0xF81F      /* 255,   0, 255 */
#define TFT_YELLOW      0xFFE0      /* 255, 255,   0 */
#define TFT_WHITE       0xFFFF      /* 255, 255, 255 */
#define TFT_ORANGE      0xFDA0      /* 255, 180,   0 */
#define TFT_GREENYELLOW 0xB7E0      /* 180, 255,   0 */
#define TFT_PINK        0xFE19      /* 255, 192, 203 */ //Lighter pink, was 0xFC9F
#define TFT_BROWN       0x9A60      /* 150,  75,   0 */
#define TFT_GOLD        0xFEA0      /* 255, 215,   0 */
#define TFT_SILVER      0xC618      /* 192, 192, 192 */
#define TFT_SKYBLUE     0x867D      /* 135, 206, 235 */
#define TFT_VIOLET      0x915C      /* 180,  46, 226 */
GUIボタン
ボタンの設定と描写
今回のボタンは、TFT_eSPI_Buttonクラスのボタンです。 本体は "/Arduino/libraries/TFT_eSPI/Extensions/Button.cpp" です。
ボタンを設定する関数として "initButtonUL()" が有ります。 以下は引数詳細。
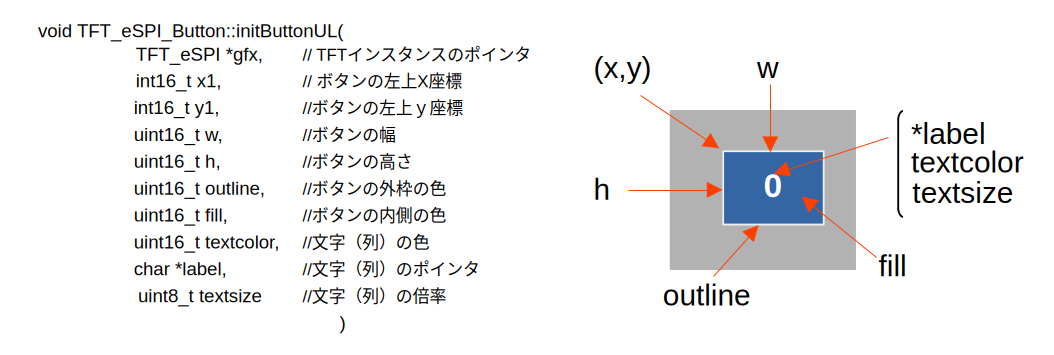
デモプログラムではこの関数を元に座標(X,Y)がボタンの中心になるように調整した "initButton()" 関数を定義ています。
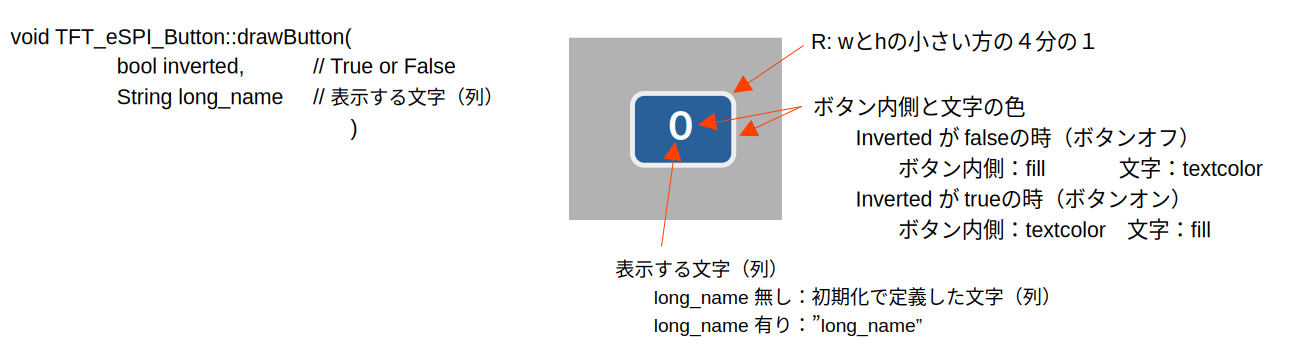
実際にボタンを描写する関数は void TFT_eSPI_Button::drawButton(bool inverted, String long_name)。 この関数の使い方は以下の通り。
ボタンタッチの判断
ボタンタッチの判断はちょっと複雑です。
- ボタンの動作は下記の4つの関数で管理されます。
- void TFT_eSPI_Button::press(bool p) { laststate = currstate; currstate = p; } bool TFT_eSPI_Button::isPressed() { return currstate; } bool TFT_eSPI_Button::justPressed() { return (currstate && !laststate); } bool TFT_eSPI_Button::justReleased() { return (!currstate && laststate); }
- 各ボタンは2つの変数(初期値False)laststate、 currstate を持っています。
- 初期状態。isPressed() justPressed() justReleased() は全て False。
- スキャンした時にボタンが押されていた場合
- press(true)を実行する。 laststate: false currstate: true に変わる。
- isPressed()とjustPressed()がtrueになる。
ー> このボタンが今押されたものと判断出来る。
- そのまま押し続けた状態でスキャンした場合
- press(true)を実行する。 laststate: true currstate: true に変わる。
- isPressed()のみがtrueになる。
ー> このボタンは押され続けている事が分かる。
- その後スキャンした時にボタンが離れていれば
- press(false)を実行する。 laststate: true currstate: false に変わる。
- justReleased()のみがtrueになる。
ー> このボタンが離された事が分かる。
- その後スキャンした時にボタンが離れていれば
- press(false)を実行する。 laststate: false currstate: false に変わる。
- 全てがfalseになる。
ー> 押されているボタンは無し。(1に戻る。)
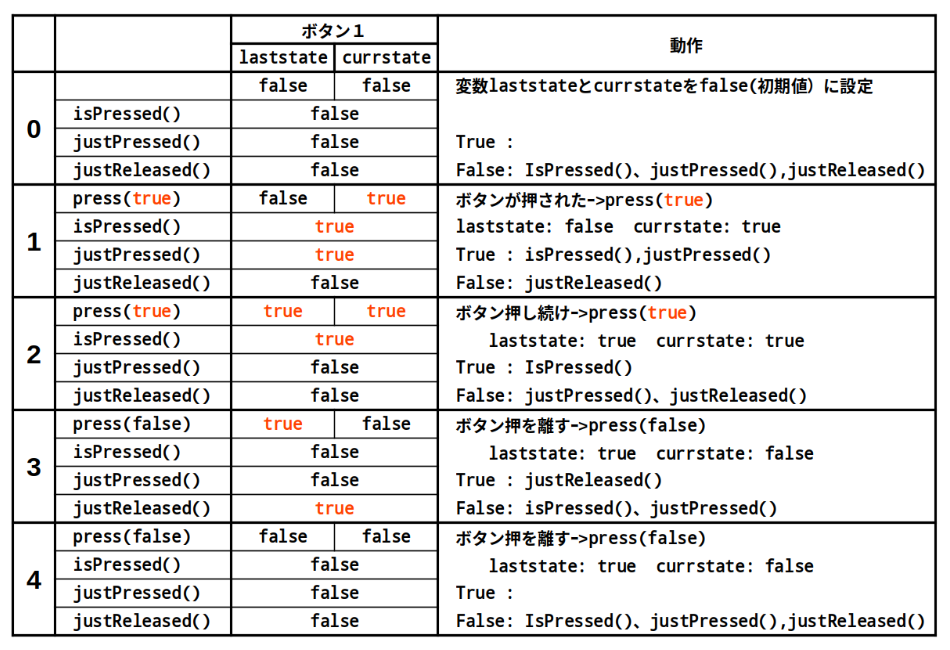
この様に2つの変数 "laststate" と "currstate" の組み合わせによりボタンの状態を判断します。
デモプログラムの流れ
デモプログラムの流れは以下の様になっています。
- 184行:void drawKeypad() でキーパッドが作成されています。
- 194行:key[b].initButton()でボタンパラメータの初期化
- 198行:key[b].drawButton();でボタンを描画(引数無しの場合 False)
- 本体は107行から
- 111行:bool pressed = tft.getTouch(&t_x, &t_y);
- この関数が実行された時点でのLCDへのタッチ状態をチェックします。
- タッチが有れば t_x, t_yにタッチのX,Y座標を代入し true を返します。
- タッチが無ければ、 false が返って来ます。
- 114〜120行:ここで各ボタンの状態をセットしています。
- タッチした座標がボタンの
- 領域内:key[b].press(true);を実行
- 領域外:key[b].press(false);を実行
- 123〜179行:ここでボタンの状態に合わせて処理を行っています。
- 134行:numberpad buttonの処理
- 144行:Del buttonの処理
- 153行:Sent buttonの処理
- 159行:New buttonの処理
- タッチした座標がボタンの
- 166〜177行:表示部の更新を行った後Loopトップへ戻ります。
- 111行:bool pressed = tft.getTouch(&t_x, &t_y);
このPadをちょっと変更して
このPadをちょっと変更してColor Editorを作って見ました。
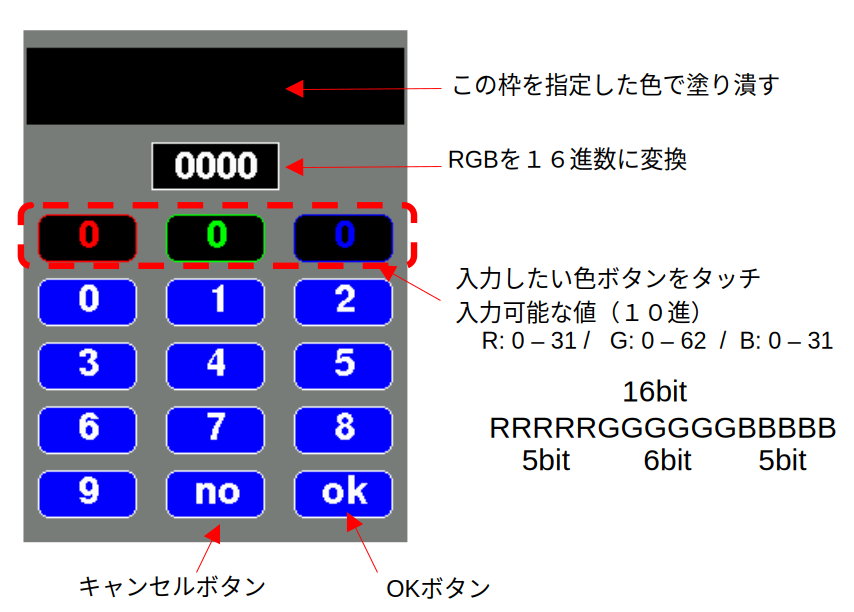
- 上段のRGBボタンを選び、データをセット。
- 枠が 赤:R 緑:G 青:B 用です。
- Rの値を入力したい場合
- 先ず赤枠にタッチ
- それ以降タッチした数字キーが赤枠に表示されます。
- 入力した数字は10進数として扱われます。
- 入力完了なら "OK"ボタンを取り消しなら "NO"ボタンを押します。
- 同様の操作を他の色にも行います。
- 10進数のRGBデータを16進数変換し表示
- 最上段の枠が指定した色で塗り潰される
#include "FS.h"

#include <SPI.h>
#include <TFT_eSPI.h>      // Hardware-specific library

TFT_eSPI tft = TFT_eSPI(); // Invoke custom library

#define CALIBRATION_FILE "/TouchCalData1"
#define REPEAT_CAL false
#define LABEL2_FONT &FreeSansBold12pt7b    // Key label font 2
// Numeric display box size and location
#define DISP_X 1
#define DISP_Y 10
#define DISP_W 238
#define DISP_H 50

// Keypad start position, key sizes and spacing
#define KEY_X 40 // Centre of key
#define KEY_Y 130
#define KEY_W 62 // Width and height
#define KEY_H 30
#define KEY_SPACING_X 18 // X and Y gap
#define KEY_SPACING_Y 10
#define KEY_TEXTSIZE 1   // Font size multiplier

// Create 15 keys for the keypad
uint8_t rgb_flg;
char rgb_data[3][5];
char keyLabel[15][5] = {"", "", "", "0", "1", "2", "3", "4", "5", "6", "7", "8", "9", "no", "ok" };
uint16_t keyColor[15] = {TFT_BLACK, TFT_BLACK, TFT_BLACK,
                         TFT_BLUE, TFT_BLUE, TFT_BLUE,
                         TFT_BLUE, TFT_BLUE, TFT_BLUE,
                         TFT_BLUE, TFT_BLUE, TFT_BLUE,
                         TFT_BLUE, TFT_BLUE, TFT_BLUE
                        };

// Invoke the TFT_eSPI button class and create all the button objects
TFT_eSPI_Button key[15];

//------------------------------------------------------------------------------------------

void setup() {
  // Use serial port
  Serial.begin(115200);

   // Initialise the TFT screen
  tft.init();
  tft.setRotation(0);
  touch_calibrate();

  // Draw keypad background
  tft.fillScreen(TFT_BLACK);
  tft.fillRect(0, 0, 240, 320, TFT_DARKGREY);
  tft.setFreeFont(LABEL2_FONT);

}

//------------------------------------------------------------------------------------------

void loop(void) {
  uint16_t t_x, t_y;
  bool pressed, chk_ok;
  uint8_t b, temp_data, c_len, st_rgb;
  char prt_data[10];

    for(b = 0; b < 3; b ++)
      sprintf(rgb_data[b], "%d", 0);
    temp_data = c_len = 0;
    drawKeypad();
    rgb_flg = 5;
    make_color(prt_data);
    chk_ok = true;
    st_rgb = char_to_int(rgb_data[0]);

    while(1){
      pressed = tft.getTouch(&t_x, &t_y);

      for (b = 0; b < 15; b++) {
        if (pressed && key[b].contains(t_x, t_y))
          key[b].press(true);  // tell the button it is pressed
        else
          key[b].press(false);  // tell the button it is NOT pressed
      }

      for(b = 0; b < 15; b ++){
        if(key[b].justReleased() && (b > 2))
          key[b].drawButton();

        if(key[b].justPressed()) {
          if(b < 3){
            if(chk_ok){
              rgb_flg = b;
              temp_data = c_len = 0;
              key[b].drawButton(true, "0");
              chk_ok = false;
            }
          }
          else{
            key[b].drawButton(true);
            if ((b < 13) && (rgb_flg < 3)) {
              if (c_len < 2) {
                if(c_len) temp_data *= 10;
                temp_data += (b - 3);
                sprintf(prt_data, "%d", temp_data);
                key[rgb_flg].drawButton(true, prt_data);
                c_len ++;
              }
            }

            if(b == 13){  // no
              key[rgb_flg].drawButton(false, rgb_data[rgb_flg]);
              rgb_flg = 5;
              chk_ok = true;
            }

            if(b == 14){  // OK
              if(rgb_flg == 1){
                if(temp_data > 62)
                  temp_data = 62;
              }
              else{
                if(temp_data > 31)
                  temp_data = 31;
              }
              sprintf(rgb_data[rgb_flg], "%d", temp_data);
              rgb_flg = 5;
              make_color(prt_data);
              Serial.print("Color Code: ");
              Serial.println(prt_data);
              chk_ok = true;
            }
          }
        }
      }
    }
}

//------------------------------------------------------------------------------------------

void drawKeypad()
{
  int c_data[3] = {TFT_RED, TFT_GREEN, TFT_BLUE};
  int a, c;
  char* rgb_txt;

  // Draw the keys

  tft.drawRect(80, 70, 80, 30, TFT_WHITE);
  for (uint8_t row = 0; row < 5; row++) {
    for (uint8_t col = 0; col < 3; col++) {
      uint8_t b = col + row * 3;
      if(b < 3){
        a = c_data[b];
        rgb_txt = rgb_data[b];
      }
      else{
        a = TFT_WHITE;
        rgb_txt = keyLabel[b];
      }

      key[b].initButton(&tft, KEY_X + col * (KEY_W + KEY_SPACING_X),
                        KEY_Y + row * (KEY_H + KEY_SPACING_Y), // x, y, w, h, outline, fill, text
                        KEY_W, KEY_H, a, keyColor[b], a,
                        rgb_txt, KEY_TEXTSIZE);
      key[b].drawButton();
    }
  }
}

//------------------------------------------------------------------------------------------

uint8_t char_to_int(char* c_buf){
  uint8_t a;

    a = c_buf[0] - 0x30;
    if(c_buf[1])
      a = a * 10 + c_buf[1] - 0x30;

    return(a);
}

void make_color(char* prt_data){
  int a;

    for(a = 0; a < 3; a++){
      if(a == rgb_flg) key[a].drawButton(true, rgb_data[a]);
      else key[a].drawButton(false, rgb_data[a]);
    }

    a = char_to_int(rgb_data[0]) << 11;
    a |= (char_to_int(rgb_data[1]) << 5);
    a |= char_to_int(rgb_data[2]);
    sprintf(prt_data, "%04X", a);

    tft.drawRect(80, 70, 80, 30, TFT_WHITE);
    tft.fillRect(81, 71, 78, 28, TFT_BLACK);
    tft.setTextDatum(TC_DATUM);
    tft.setTextColor(TFT_WHITE,TFT_WHITE);
    tft.drawString(prt_data, 120, 75);

    tft.fillRect(DISP_X + 1, DISP_Y + 1, DISP_W - 2 , DISP_H - 2, a);
}

void touch_calibrate()
{
  uint16_t calData[5];
  uint8_t calDataOK = 0;

  // check file system exists
  if (!SPIFFS.begin()) {
    Serial.println("formatting file system");
    SPIFFS.format();
    SPIFFS.begin();
  }

  // check if calibration file exists and size is correct
  if (SPIFFS.exists(CALIBRATION_FILE)) {
    if (REPEAT_CAL)
    {
      // Delete if we want to re-calibrate
      SPIFFS.remove(CALIBRATION_FILE);
    }
    else
    {
      File f = SPIFFS.open(CALIBRATION_FILE, "r");
      if (f) {
        if (f.readBytes((char *)calData, 14) == 14)
          calDataOK = 1;
        f.close();
      }
    }
  }

  if (calDataOK && !REPEAT_CAL) {
    // calibration data valid
    tft.setTouch(calData);
  } else {
    // data not valid so recalibrate
    tft.fillScreen(TFT_BLACK);
    tft.setCursor(20, 0);
    tft.setTextFont(2);
    tft.setTextSize(1);
    tft.setTextColor(TFT_WHITE, TFT_BLACK);

    tft.println("Touch corners as indicated");

    tft.setTextFont(1);
    tft.println();

    if (REPEAT_CAL) {
      tft.setTextColor(TFT_RED, TFT_BLACK);
      tft.println("Set REPEAT_CAL to false to stop this running again!");
    }

    tft.calibrateTouch(calData, TFT_MAGENTA, TFT_BLACK, 15);

    tft.setTextColor(TFT_GREEN, TFT_BLACK);
    tft.println("Calibration complete!");

    // store data
    File f = SPIFFS.open(CALIBRATION_FILE, "w");
    if (f) {
      f.write((const unsigned char *)calData, 14);
      f.close();
    }
  }
}
次回は
次回は色んなフォーマット画像の表示に付いて説明したいと思います。